Encapsulated Services with Consul and Confd
In a landscape where software infrastructure is getting more and more dynamic, dynamic communication of services with other services as well as with their environments is increasingly important.
Using REST to communicate between services is basically a no-brainer, but locating a service or replacing config files with a REST API isn’t as obvious of a decision. Of course wiring a domain name to an IP with the GoDaddy GUI, or maintaining config files on dozens of servers doesn’t seem right either.
Emerging solutions such as Consul and Confd help solve this problem. Consul takes an approach that provides the flexibility of a REST API and the portability and ubiquitousness of DNS (a custom DNS server). Confd leverages the centralized key/value store maintained by Consul to expose a static config (that updates dynamically.)
The quick start guides for both are pretty solid, so I’m not going to do a setup tutorial. Instead I’ll give you a tour of a working cluster and walk you through how to do some common things. To follow along, here is all you need to get the 6 node example environment running in Vagrant. It will even be using the same IPs so you can click through on links.
Getting Started
Look through the Vagrantfile to get an idea of what we’re setting up, but essentially we are building:
- 2 consul server agents
- 1 consul agent hosting a “status” web gui
- 2 example service nodes
-
1 demo web-app that will interact with the service
  $ git clone git@github.com:benschw/consul-cluster-vagrant.git
  $ cd consul-cluster-vagrant
  $ vagrant up
Some notes
- I’ve included dependencies in the
/binfolder, but if you don’t trust me you can replace the binaries with other copies (see the README.md for where I got each.) confdis built off of master as consul support won’t be baked in until the 0.4 release.- Each node is wired to use 256mb ram, so this cluster should run OK on most systems. My i7/8gb laptop stays under a load of 1.
Some things to try out
Status Web UI
Go take a look: http://172.20.20.12:8500/ui (the vagrant cluster defines your ips explicitly, so you can just follow this link.)
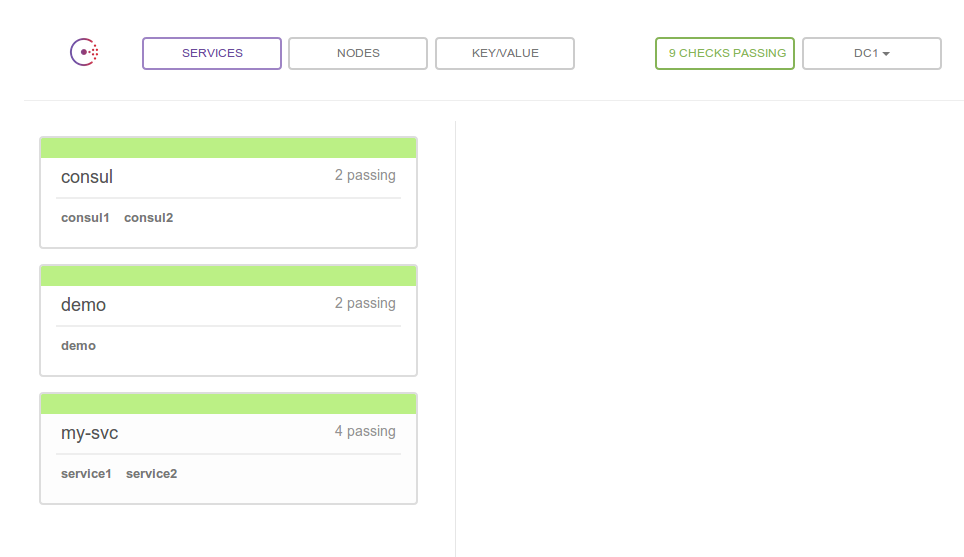
It’s pretty straight forward, so just poke around. You can view all registered services and the nodes instances of your service are running on, or go to the “Nodes” tab and see a list of nodes with the services running on each. There are also health check status and key/value tabs that we’ll talk about later.
CLI Tool
To try out the cli tool, you need to get onto one of the cluster nodes. From there you can can find out more about whats going on.
$ vagrant ssh demo
$ consul members
demo      172.20.20.15:8301  alive  role=node,dc=dc1,vsn=1,vsn_min=1,vsn_max=1
status    172.20.20.12:8301  alive  role=node,dc=dc1,vsn=1,vsn_min=1,vsn_max=1
consul1   172.20.20.10:8301  alive  role=consul,dc=dc1,vsn=1,vsn_min=1,vsn_max=1,port=8300,bootstrap=1
consul2   172.20.20.11:8301  alive  role=consul,dc=dc1,vsn=1,vsn_min=1,vsn_max=1,port=8300
service2  172.20.20.14:8301  alive  role=node,dc=dc1,vsn=1,vsn_min=1,vsn_max=1
service1  172.20.20.13:8301  alive  role=node,dc=dc1,vsn=1,vsn_min=1,vsn_max=1
You should also check out:
consul info- some general info about your clusterconsul monitor- stream log output- the documentation…
REST API
You can do everything through the REST API. Including managing your cluster, registering services, working with key/values… everything.
$ vagrant ssh demo
$ curl http://localhost:8500/v1/catalog/service/my-svc
[{"Node":"service2","Address":"172.20.20.14","ServiceID":"my-svc","ServiceName":"my-svc","ServiceTags":["microservice"],"ServicePort":8076},{"Node":"service1","Address":"172.20.20.13","ServiceID":"my-svc","ServiceName":"my-svc","ServiceTags":["microservice"],"ServicePort":8045}]
Again, the documentation is good.
DNS
One of the most powerful features of consul, is its custom DNS server. If you want to keep your application decoupled from consul, then you probably don’t want to leverage the REST API. That’s what DNS is for.
$ vagrant ssh demo
$ dig @127.0.0.1 -p 8600 my-svc.service.consul SRV
...

;; ANSWER SECTION:
my-svc.service.consul.	0	IN	SRV	1 1 8076 service2.node.dc1.consul.
my-svc.service.consul.	0	IN	SRV	1 1 8045 service1.node.dc1.consul.

;; ADDITIONAL SECTION:
service2.node.dc1.consul. 0	IN	A	172.20.20.14
service1.node.dc1.consul. 0	IN	A	172.20.20.13

...
Cool, right?
Just remember that its running on a custom port and not wired against your resolv.conf by default, so you will need to manually resolve the address. The demo app/service referenced in this example contains a simple load balancer prototype for working with consul’s SRV records.
Note that we need the SRV records and not just the A records because the SRV entries also have the port our service is running on
Give Confd something to work with
You may have noticed that our service endpoint (http://172.20.20.13:8045/foo) is reporting that Foo = "<no value>". This is because although we wired up confd to sync a key from consul to our local config (in the Vagrantfile,) we never actually added a key to consul.
Here are two methods to set Foo to some value:
- Navigate to http://172.20.20.12:8500/ui/#/dc1/kv/ and create the key
foo. -
Use the REST API
 $ vagrant ssh demo
 $ curl -X PUT -d 'bar' http://localhost:8500/v1/kv/foo
Confd listens for changes to designated keys in consul and runs them through a template to produce your config file.
Our Demo Webapp
Included in our cluster example is a demo webapp and service named “demo.” Rather then have a separate service app and ui app, I just baked all functions into one application for simplicity. Here are the available urls:
- http://172.20.20.13:8045/status A url for consul to curl to validate that the service is healthy. Both applications use this.
- http://172.20.20.13:8045/foo A REST resource that exposes information about the “my-svc” service (its host name and a value from a config maintained by confd.)
- http://172.20.20.15/demo The web ui: this will use consul to discover “my-svc”, make a request to
my-svc/foo, and then emit what it has found to the screen.
If you want to dig around in the demo app, or add to it, here’s the src
Fail a Health Check
Lets see how consul protects us when one of our services starts misbehaving. The demo app exposes a status endpoint that will emit “OK” when the service is healthy, and something else when it is not. Rather then actually testing health, this endpoint is configured to look for the existance of the file /tmp/fail-healthcheck and if it exists, start emitting “FAIL” instead of “OK”.
Before we induce the failure, run through this punch list to see what a healthy cluster looks like. Since we will be failing the instance of “my-svc” running on “svc1”, keep an eye on that.
- Verify that all checks are passing: http://172.20.20.12:8500/ui
- Verify that our status endpoint is currently “OK”: http://172.20.20.13:8045/status
- Watch the webapp load balance randomly between our two instances: http://172.20.20.15/demo (click refresh a bunch)
-
See what the healthy DNS for “my-svc” looks like:
  $ ssh vagrant svc1
  $ dig @127.0.0.1 -p 8600 my-svc.service.consul SRV
OK! Now lets make “my-svc” fail on “svc1”:
$ vagrant ssh svc1
$ touch /tmp/fail-healthcheck
Run back through the punch list to see how everything changed. We’ve got “critical’s” in our status ui, “FAIL” in our endpoint, the demo app is only using “svc2” now, and we can see why by inspecting DNS.
You can go ahead and rm /tmp/fail-healthcheck and everything will be right in the world again.
Why’d we exit 2?
If you paid attention to the consul config for “svc1,” you might have noticed that our health check is exiting with a 2 instead of the more traditional 1. This is another pretty cool feature of consul.
curl localhost:8045/status | grep OK || exit 2
Consul uses nagios style checks for its health checks. This meens that exiting with a 0 means everything is passing. Exiting with a 1 is just a warning: things will turn red, but the service will not be taken out of load balance. Exit with anything greater than 1 will result in a “critical” state and the service will not be returned in a DNS lookup etc.
Why is this cool? Lots of monitoring solutions are using this style of check these days, so you can use the same checks for all of them.
Wrapping up
Thanks for walking through my demo! If you just read through it but didn’t run your own cluster, you really should!
One last thing to do with your cluster
Technically speaking, although we needed the -bootstrap flag for the consul1 node when we started the cluster, we don’t need it anymore (and if we ever needed to restart it, we would need to get rid of it.) So to be a little more production like, you can do the following to kill that consul agent and then restart it, re-joining via consul2:
$ vagrant ssh consul1
$ sudo killall daemon
$ sudo daemon -X "consul agent -server -data-dir /tmp/consul -node=consul1 -bind 172.20.20.10 -join 172.20.20.11"
comments powered by Disqus